Welcome

Shopping Cart

•••••

Your cart is currently empty.

Education

Method Spotlight: Pipe Inspection Cameras

Underground pipe leaks are often considered the most difficult swimming pool leaks to find, especially because it’s so important to be confident in the location of the leak before beginning costly repairs. Recognizing the benefits and limitations of different pipe leak location methods can help you choose the right method for the situation.

The allure of being able to actually see underground pipe leaks and locate them precisely makes the use of pipe inspection cameras with sondes an appealing option. While other methods may generally be faster or have a higher success rate, when used in the right situations pipe inspection cameras can play a critical role in swimming pool leak detection.

When To Use:

Generally, pipe inspection cameras are used as a backup method when sonic leak location does not work or as a way to confirm the location of a leak found with an alternate method. Cameras tend to be more advantageous when there are large leaks, suction side leaks, or flex pipe with few elbows or T fittings. The one situation where we would recommend using an inspection camera before attempting sonic leak location is if there are air bubbles coming into the pump from a specific suction line.

Additionally, the locator that is used to identify the camera head location via sonde transmitter can be used to trace where plumbing lines run. This feature can be beneficial when used together with sonic leak location to narrow your search area.

Process:

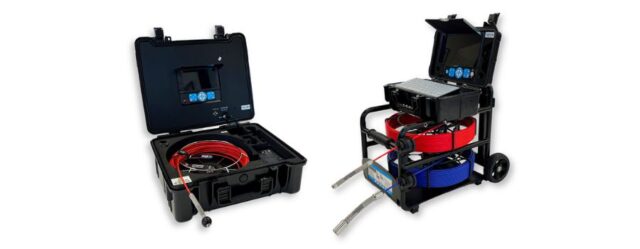
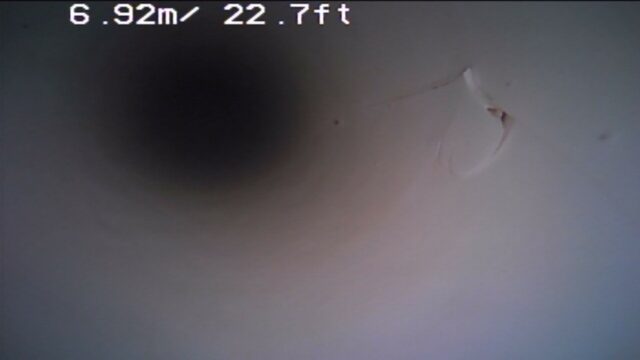
The process for using a pipe inspection camera is simple – feed the camera through the line to visually inspect the inside of the pipe. Typically, pipe inspection cameras will feature a small camera on the end of a flexible rod that can be pushed through the plumbing line. The camera will record a live visual of the inside of the pipe that can be viewed on a screen from the deck. Once a leak is identified, a transmitter on the camera head can be located from above ground with a locator to identify the precise location of the camera head and leak.

While feeding the camera through the pipe, watch for:

  • Cracks
  • Punctures
  • Blockages or crushed pipe
  • Air being pulled into the pipe while under suction
  • Movement of leak locating dye

Challenges:

It may not be possible to get the camera to the leak location.

Navigating the many 90-degree elbows and T-fittings in swimming pool plumbing poses a challenge. Fortunately, many of the new smaller inspection cameras can get past several 90-degree elbows with an aggressive push. This is especially the case with elbows close to the camera entry point, but the further down the plumbing line the camera gets, the less likely it is that the camera head will slide past an elbow. One way to help maneuver through bends is to tie a string to the end of the camera and gently tug on it to keep the camera head from getting stuck while pushing past elbows or T’s.

While camera designs and strings can help get a camera further down the line, there are still real limitations to getting a camera to certain points in pool plumbing. Long runs of plumbing, multiple jets on one line, and spa jets can prove difficult or impossible with the inspection camera method.

Swimming pool plumbing is hard on inspection cameras.

Pushing cameras through narrow pool plumbing can be hard on them, but durability has improved over the years and many cameras do a better job of taking the abuse of pool plumbing than they used to. It’s important to be mindful that the connection between the camera head and cable is especially vulnerable to damage when pulling the camera back through plumbing. Additionally, while getting a camera head stuck in the line isn’t common, it can happen.

The leak may not be visible even if the camera can reach it.

Pipe inspection cameras work best in large water loss situations where severed pipe or large cracks are clearly visible. However, sometimes smaller pipe leaks are impossible to see. For instance, a poorly glued fitting looks fine from the inside. Or, a crack on the inside of an elbow often isn’t visible due to the camera head position and angle. It is not uncommon to go right past the leak and not notice. In this case, administering leak locating dye in front of the camera near suspect areas in a option to test for or verify a leak location. This is done by attaching dye tester extension tubing to the camera head and feeding it into the pipe along with the camera. While this can help, it’s best to dye test within about 1/4″ of a suspected leak and dye often can’t be placed that precisely when it is injected this way.

The clearest visual you can get of a leak is when air bubbles get drawn into suction side plumbing through the leak when the pump is running. When this is the case, inspection cameras can be inserted through a skimmer or main drain to identify where the air is coming into the line.

Using pipe inspection cameras is time intensive.

While the pipe inspection camera method has some great benefits, time savings is not one of them. As with any method, you could get lucky and find the leak right away, but could also spend significant time watching the screen while wiggling the camera inch by inch through long plumbing runs. Plus, there are a surprising number of things in pool plumbing that look like leaks but may not actually be causing water loss. So even if you find what you think is a leak, you often have to use a secondary method to verify that it is indeed a source of water loss.

Key Equipment Features:

With many options on the market, there are a few characteristics to consider when purchasing a pipe inspection camera for swimming pools.

  • Clear and Well-lit Screen – Since most swimming pools are outside, a bright screen is important. Adjustable light settings on the camera head are also helpful.
  • Sonde Transmitter – Make sure the camera head is equipped with a transmitter than can be picked up with a locator.
  • Push Rod Length – Since most leaks are generally close to the pool or close to the equipment, you might be able to get by with a shorter camera rod length of 65′, but in order to inspect as much plumbing as possible, a 100′ length is desirable. You can enter from both ends of the pipe if needed.
  • Camera Head Size – Due to the prevalence of 1.5″ plumbing in swimming pools, you will want a smaller camera head that fits in that size pipe.
  • Push Rod Strength – The push rod should be more flexible for smaller piping (0.75 – 2″ piping) and stiffer for larger piping (2.5″ and up). Flexibility is often signified by cable diameter.
  • Durability and Reparability – Pool plumbing is hard on cameras – quality matters and so does the ability to repair the camera if you have issues.

Bottom Line:

While pipe inspection cameras are not needed to locate most underground pipe leaks, they can provide great value to the swimming pool leak detection process. The ability to locate the precise location of a leak through the use of a sonde and locator is unique, and providing pictures and videos of the leak can increase your professionalism. Plus, these images are great additions to a report. While inspection cameras may not be the go-to method in many situations, their inclusion in your toolbox is justified.


Pressure Testing Principles


You may know that it’s best to use water to isolate leaking plumbing lines with a pressure test, but do you know why? Check out this video to learn about the pressure testing principles that describe how water and air interact in pool plumbing, and how that impacts your tests to find plumbing leaks.


  1. Air compresses under pressure, water does not.

This is the primary reason why we recommend using water for a pressure test instead of air. If air and water are both present in the plumbing line during a pressure test, the air will compress under pressure and can slow down the pressure drop you see on your gauge. On a long run of plumbing this can reduce the pressure drop to an imperceptible amount, making a leaking pipe look like it held pressure.

  1. Air escapes from a leak faster than water does.

You will see a much faster pressure drop when air escapes from a leak than when water does. If you’re trying to get air to a leak to be able to start pinpointing the leak with a listening device, watch for a dramatic drop in pressure. Once this happens you’ll know that air has reached the leak and you can start listening for the telltale bubbling/gurgling noise.

  1. Water stays low in the plumbing line, air stays high.

Water and air do not stay “mixed” in a plumbing line – the water will always go to the bottom of the plumbing and air will stay high. Even if both water and air are induced at the same time they will separate in the pipe. You won’t make a good leak noise if the leak is in a low part of the plumbing and all of the water above the leak has not been purged.  Additionally, you can create distracting noises where air bubbles through water if you’re inducing pressure from the low end of the plumbing.

The Bottom Line

There are two parts to finding leaks in swimming pool plumbing – isolating the leaking line with a pressure test and pinpointing the leak by listening through the pool deck. For effective pressure tests, make sure the line is entirely filled with water. When you’re ready to start listening, make sure that air is reaching the leak in order to make a clear noise.

For more detailed information about pressure testing and sonic pipe leak location, see the corresponding slideshows in our Resource Center. These slideshows provide an in depth explanation of the process and tools used for each test using text annotations and graphics. Don’t hesitate to call us at 800-348-1316 if you have any questions about the material!


Finding Leaks In Green Pools

When performing a leak job there are certain pool conditions that are important to have in place when you get to the job site.  The pool should be filled to normal operating level, and it’s best if the water is clear, clean, and warm.  Of course, even with prior communication things aren’t always ideal. So, what do you do if you arrive at a pool that’s cloudy or green?

In many cases it may be best to just walk away.  Simply put, you can’t see through green water and anything that requires visual observation will be compromised. The chances of success in locating and repairing a leak go down if there is a problem with visibility. Plus, you need to be careful about health risks and equipment damage when working on green pools. So even though you’ve already invested time in just getting there, it’s frequently best to have the customer clear up the pool and schedule a time to come back.

With that being said, cleaning up a green pool before a leak detection appointment can be a difficult  or unreasonable task. Especially because it’s common for leaking pools to be green because they are leaking – it’s hard to maintain chemical balance when you’re consistently adding untreated water to the pool. So, if you have no choice but to work on a green pool, here are a few tips to keep in mind.

Sometimes the water is actually clear but algae is covering the shell surface.  In these cases look for a spot that has no algae.  The water movement of a leak often washes out the algae in that area.  This can make for a quick and easy job!

Algae is washed away around leak. There is also a stick stuck in the leak.

If the water is so green that you can’t effectively do any dye testing, electronic equipment that doesn’t require you to get in the water. Both the LeakTrac and hydrophones can be used, as long as they are cleaned off immediately afterwards.  Pressure testing  and pipe leak location can also be done. Keep a pair of stay dry gloves on hand to keep your arms algae free when putting in plugs.

One of the most important things when dealing with unfavorable conditions at a pool is to set clear expectations for the job.  If you do have to perform work on a green pool, let your customer know that your efficiency and effectiveness may be impacted but that you will still be charging for your time.


Listening For Plumbing Leaks With A Hydrophone

Even if you’ve made a good leak noise and are using your electronic listening device filters correctly to pinpoint the location of a plumbing leak using a deck microphone, you may want to use your hydrophone attachment from within the pool to get an additional angle on these plumbing leaks. If the leaking pipe is close to the pool wall, or in a main drain line under the pool, the bubbling noise of air escaping from the pressurized pipe can be heard with your hydrophone through the pool wall. Using a hydrophone is a great way to double check or verify the location you identified from pool deck or help hone in on a leak noise that spans a large area.

Leak technician using hydrophone to listen through pool wall

Because you’re often able to get so close to the leak when listening through the pool wall, the digital readout on your Fisher electronic listening device is especially helpful for this use. There will typically be a more definite high point in the volume readout, which can be more accurate than just relying on your ears to determine the loudest place.

Based on our experience, this method of using a hydrophone for pipe leaks has proven to be much more effective than listening for problems from inside the line.  Trying to get the hydrophone into pipes past T’s and elbows is time consuming (if not impossible), and unpressurized leaks may not even make a perceptible noise.  Knowing how to use the right tool at the right time is an important way to make your leak detection jobs efficient and accurate.


Common Signs Of A Leaking Pool

Water loss is the most obvious sign of a leaking pool, but are you able to recognize the other common symptoms? Watching out for these signs at your customers’ pools can help them get ahead of further damage and puts you in the position to he the hero that can solve the problem!

infographic showing the common signs of a leaking pool

1. Water Level Changes

Dropping water level is the clearest sign a pool is leaking, but it’s important to determine if the water loss is due to evaporation or a leak. Evaporation rates vary depending on wind, air and water temperature, humidity, and other factors. Use our Evaporation Calculator to see the evaporation rate in your area based current weather data. Water loss in excess of that amount indicates that the pool is leaking.

2. Cracks or Falling Tile

Because the surrounding ground is becoming unsettled by the presence of excess water, cracks and tile movement are more likely to occur when a pool is leaking. Cracks or gaps in the bond beam may occur as the pool settles farther into the softened ground.

3. Wet Spots in Yard

Soft, mushy spots or uneven grass growth around the pool area may indicate a plumbing leak. Erosion due to water movement underground can cause landscaping to shift and sink.

4. High Water Bills

Automatic fill devices can hide leaks by keeping the pool filled. If you notice the autofill running constantly or increased water bills it’s time to start investigating for a leak.

5. Water Under Equipment

Standing water or corrosion at the pump or around pipes is a sure sign of a leak. Equipment leaks can often be found with just visual inspection.

6. Air or Dirt Blown Into Pool

If air or dirt is being pulled into the plumbing system through a leak, you may see that air or dirt being blown into the pool from the returns. This may also cause mysterious gurgling sounds.

7. Algae Growth

Continually adding new, untreated water to a leaking pool often leads to fluctuating chemical consumption and algae growth or discoloration. Instead of continuing to treat the water, finding and repairing a leak may be the solution.


Understanding “No Water Loss” Leakalyzer Tests

While Leakalyzer tests that show water loss are extremely valuable for more efficiently locating leaks, using the Leakalyzer to identify when no water loss is happening is just as valuable.  One of the biggest wastes of time for a leak detector is trying to find a leak that doesn’t exist. But, leaks aren’t the only factors that cause a change in water level, and homeowners can be quick to call for help without considering the other factors that may be at play. In these situations the Leakalyzer can help confirm if in fact the pool is leaking before starting work. Or, once a leak has been found and repaired, a no water loss test can confirm that your repair is holding and that no other leaks are present.

Even though it seems like reading these tests should be straight forward, the Leakalyzer is so sensitive that minuscule changes in water level that are smoothed out during a water loss test show up more significantly on a no water loss test, making the trend harder to identify. The spikes that show up on the graph in these situations don’t mean it’s a bad test, they just show that the Leakalyzer is being extremely accurate. Because of the movement in pools, the water level is constantly going up and down slightly. Remember, the Leakalyzer is able to measure water level changes down to the 10,000th of an inch (the size of a red blood cell!), so you’ll see these tiny changes on your graph.

When looking at the graph, the ability to identify trends is the key to effective use and interpretation. You’re trying to look past the up and down spikes to identify if as a whole they are trending flat or downward. For instance, if you are 10 or 15 minutes into the test and still consistently spiking on either side of zero or the evaporation mark it is most likely a no water loss situation. However, if the test is going up and down but both the highs and the lows are consistently getting lower there is most likely a leak.

Another aspect to watch is the scale of the graph.  The scale automatically adjusts based on the measurements that the Leakalyzer is recording. Sometimes when the pool isn’t losing water, the ups and downs on the graph can look drastic, but the scale of the graph is still at 0 to 30. This makes for very dramatic spikes with very little actual change in the water level.  Zooming out to a 120 or 240 scale causes those spikes to look more realistic, and will help identify a flat line trend.  Remember, a measurement of 100 on the scale is only equal to the thickness of a sheet of paper! Take a look at the below graphs to understand how the scale affects no water loss tests.


Common Skimmer Repair Solutions

Skimmers are one of the more complex plumbing components in the pool and when they leak many contractors default to suggesting a full replacement. But if you have the right repair materials you can offer repair options that will save your customers this big expense and build their trust in you for future jobs. We’ve outlined repair solutions for some of the most common skimmer leaks below.

Mouth

On concrete pools, epoxy putty is a versatile option for repairing small cracks where the skimmer mouth meets the shell of the pool. Leakmaster Quick Set or Pool Repair putties are a cost-effective, convenient choice, while the color selection and workability of A+B Putty makes a good choice when aesthetics is especially important.  Putty is so inexpensive that many leak detectors include putty repair as part of the detection cost.  It is, however, a somewhat temporary repair and may have to be replaced seasonally.

A more permanent solution for skimmer mouth issues is to use a foam injection process to seal the cracks and fill voids around the skimmer body.  Closed cell urethane foam fills and stabilizes voids around the skimmer body to make sure that further damage doesn’t occur while also sealing leaks around the mouth. Our complete Crack Repair Starter Kit includes everything you need to to do a skimmer injection plus tools to expand into concrete crack injection, or our Skimmer Injection Kit provides the materials you need to inject 2-3 skimmers without an investment in the more expensive tools needed for crack injection.

Throat

For a cracked fitting or pipe within the first six inches from the bottom of the skimmer bowl, the Skimmer Saver is a unique and easy option. Part of the popular Fitting Saver line, this device allows water to bypass the cracked area of the plumbing while still maintaining regular circulatory function. It can be used as a permanent repair or as a temporary solution until another repair can be done.

Bowl/Body

Due to movement in the ground around the pool, skimmer bowls are especially susceptible to cracks that can be particularly challenging to repair. Leakmaster Pool Glue  provides a versatile solution. The two-part glue hardens like an epoxy putty but is much more adhesive, meaning it will be able to weather the movement of the pool without coming loose. While it’s able to seal smaller cracks on its own, it can also be used with fiberglass mesh strips for extra reinforcement on large cracks. Check out this video to see how the repair is done.


Check us out in Pool Pro Magazine!

Anderson Manufacturing was recently featured in an article about leak detection in Pool Pro Magazine. The article explores some of the things to consider when making the decision to add leak detection as a service offering.

We believe that if you’re determined and willing to learn, leak detection can be a profitable and rewarding service offering for your company. As mentioned in the article, all of our training materials are available for free in our Resource Center and we also offer in-house training. If you’re looking to purchase equipment we have pre-set packages to get you started or you can give us a call to put together a custom package that’s perfectly suited to your needs. We value the opportunity to be your partner in leak detection success!


Troubleshooting Underground Pipe Leaks


There is no question that pinpointing underground pipe leaks in swimming pool plumbing can be tricky, especially when first starting out. While many different scenarios pose many different challenges, generally issues with pinpointing leaks fall into one of two categories:

  1. Not hearing a noise
  2. Hearing a noise in a large area and having trouble narrowing it down

Below are a few solutions to these common issues.

If You Can’t Hear A Noise:

First of all, don’t overlook just turning up the volume on your listening device. This can often be the fix for deeper leaks. However, more often than not adjusting your technique to make the correct leak noise is the solution to the problem. Remember, the noise you’re trying to achieve is a distinct bubbling gurgling noise that comes from air escaping through the leak into water saturated soil. For a refresh of the basics of this technique check out our “Pipe Leak Location” slideshow in the Resource Center. Below are the two most common problems that keep you from making a good leak noise.

1. Air is not reaching the leak

Air needs to be escaping from the leak into water saturated soil in order to make the noise that you’re listening for. Even if you’re inducing air into the plumbing, it may not be actually be reaching the leak due to leftover water in the pipe. Remember, water stays low in the plumbing and air stays high. If the leak is on the bottom of the pipe or in a lower section of the plumbing, it can take a long time for the induced air to push all the water out of the leak.  Air can only reach the leak if all of the water above leak level has been purged from the line. Only once you’re sure that air is escaping from the leak is it time to start listening. There are two ways to be more confident that air is reaching the leak:

  • One way to be sure air is reaching the leak is to remove the lowest plug from the line and completely purge all the water out of the line with air before reinstalling the plug and building air pressure. Since the location of the leak and how the plumbing runs is unknown at this point, this can be a time-saving solution.
  • Another way to make sure air has reached the leak is to slowly push the remaining water out through the leak by inducing air into the line. Once enough water has been pushed out and air starts escaping from the leak you’ll see a dramatic drop in pressure on your pressure gauge. This happens because air escapes from a leak faster than water does, so when the air reaches the leak that cushion of air escapes rapidly . . producing the telltale pressure drop. Once this happens it’s time to start listening. On top of not having to remove and then replace plugs, another benefit to this approach is that you further saturate the soil outside of the leak, producing a better environment for a better noise. For safety, always watch the pressure gauge so that too much pressure doesn’t build up.

2. The soil is not saturated with water

Once you know that air has reached the leak, if you still can’t hear a noise you may be dealing with a situation where the soil is not saturated enough with water. If this is the case there are a few options:

  • The first option would be to saturate or re-saturate the soil by inducing more water into the pipe and letting it escape out through the leak. Once the soil is saturated, switch back to inducing air and listen with your listening device.
  • If you are in a situation where there has been washout or the pipe is in gravel-y soil it can be difficult to maintain saturation outside of the pipe.  In this case, the technique of inducing water from the lower end of the plumbing and air from the high end with the goal of making them meet at the leak can make a great noise. You will need two means of inducing pressure, but this is a technique that can be quite effective.  This is often used on big breaks in lines where you can’t even build up pressure. If it is a smaller leak; take extra care to not build up too much pressure, this would be an indication that water is being put into the line faster than it is escaping and that air can no longer reach the leak . If you see the pressure gauge rising, reduce the rate of water flow into the line.

If You Hear A Noise Everywhere:

Many times the leak noise is so loud that it can be heard in a large area, so honing in on the precise location is a challenge. Like above, volume controls can help. Just turning the volume down can reduce the area in which you can hear the leak. Also, adjusting the amount of air being induced might give you a more distinct or crisp bubbling sound. If you’re still hearing the noise in a large area, these are some things to keep in mind as you listen:

  • The noise should be loudest AND clearest where the leak is. As you listen, don’t just look for the loudest, but also the clearest sound.  Just as sound levels soften the further you get away, sounds also begin to muffle and aren’t as clear the further you get from the leak.
  • Find and mark the outer edges of the sound area. As you move around you will eventually see a drop off in noise volume. Marking these boundaries can give you a good visual of where the center or source of the leak noise is.
  • Using the Frequency Filters on your XLT30 or XLT17 is one of the best ways to hone in on the leak sound. These filters provide significant help in reducing the search area, minimizing background noise and helping to hear a clear and distinct sound. For more detailed information on using filters check out this blog post.

Understanding Frequency Filters on Electronic Listening Devices

Ever have trouble honing in on an underground pipe leak?  Understanding how to use the frequency filters on an electronic listening device can greatly increase accuracy in underground pipe leak location.  Once the correct noise is being made at the leak and the volume of the listening device is set properly, adjusting the frequency filters can provide a great advantage in identifying the leak sound and pinpointing the exact location.

Inducing air into a leaking underground plumbing line will produce a sound right at the leak’s location where the air escapes into water saturated soil. This noise at the leak is a distinct gurgling noise that produces sounds in most of the audible frequency ranges. Understanding those frequencies can help identify the exact location of the pipe leak.  To illustrate this idea, think of a leak noise like a choir.  In a choir you hear the song being sung as a whole but it is made up of different parts: sopranos (high frequencies), altos, tenors and bases (low frequencies).  Manipulating the filters on an XLT17 or XLT30H can focus in on a specific frequency and which is beneficial for eliminating background noise and zeroing in on the leak.

How to identify which frequency range to choose  has to do with how sounds travel.  Low frequency sounds travel further than high frequencies. This is evident at an outdoor concert.  Approaching the concert from a long ways away, the first noise that you’ll hear is the base due to its low frequency. The other higher frequency ranges aren’t heard until getting closer to the stage – the source of the sound. When listening for a leak noise, starting on a low frequency allows us to hear noises in a broader area. Then, once a leak noise is identified in a broad area, switching to a higher filter blocks out the lower frequencies in order to get closer to the leak.

Filtering can also help limit unwanted background noise in order to hear the sound of the leak more distinctly. Often times the hum of an air conditioner, electrical noise, or even cars on a freeway can be distracting when listening for a swimming pool pipe leak.  While unfortunately there is no “air conditioner button”, by using the frequency filters to block out the frequency range that is most distracting, the leak noise we’re listening for becomes clearer.  The XLT30H even has a specific adjustable notch filter for this purpose.

In general the leak noise should be the loudest right on top of the leak. In addition to being loud the leak noise will also be the most clear or distinct right over the leak.  Sound waves will get muffled or disrupted the further they have to travel.  Like at the outdoor concert, the overall sound may be heard from farther away than the actual words being sung. Listen not just for the loudest noise but the clearest and most distinct sound.

It takes time to play around with the different filtering options in order to understand how they impact leak noise. If you’re just getting started with leak detection, take some extra time during your next sonic location to play around with the filters on your listening device. Every job is also a learning opportunity!


Visa, Discover, MasterCard, American Express, & PayPal