Welcome

Shopping Cart

•••••

Your cart is currently empty.

Equipment & Products

Method Spotlight: Pipe Inspection Cameras

Underground pipe leaks are often considered the most difficult swimming pool leaks to find, especially because it’s so important to be confident in the location of the leak before beginning costly repairs. Recognizing the benefits and limitations of different pipe leak location methods can help you choose the right method for the situation.

The allure of being able to actually see underground pipe leaks and locate them precisely makes the use of pipe inspection cameras with sondes an appealing option. While other methods may generally be faster or have a higher success rate, when used in the right situations pipe inspection cameras can play a critical role in swimming pool leak detection.
When To Use:

Generally, pipe inspection cameras are used as a backup method when sonic leak location does not work or as a way to confirm the location of a leak found with an alternate method. Cameras tend to be more advantageous when there are large leaks, suction side leaks, or flex pipe with few elbows or T fittings. The one situation where we would recommend using an inspection camera before attempting sonic leak location is if there are air bubbles coming into the pump from a specific suction line.

Additionally, the locator that is used to identify the camera head location via sonde transmitter can be used to trace where plumbing lines run. This feature can be beneficial when used together with sonic leak location to narrow your search area.

Process:

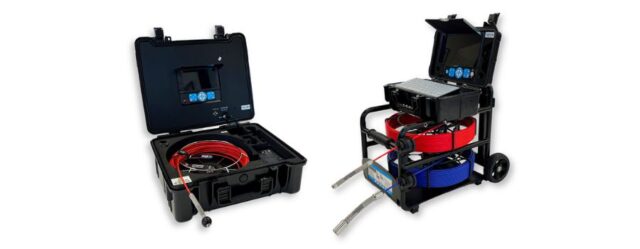
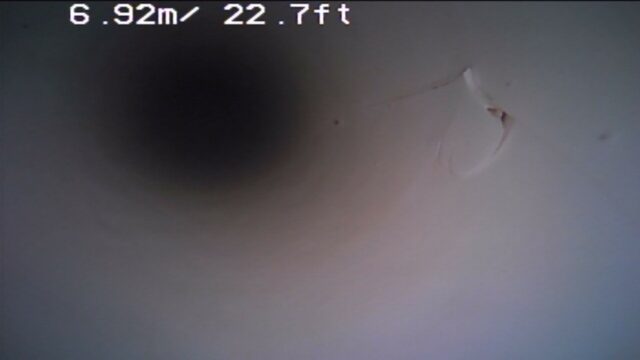
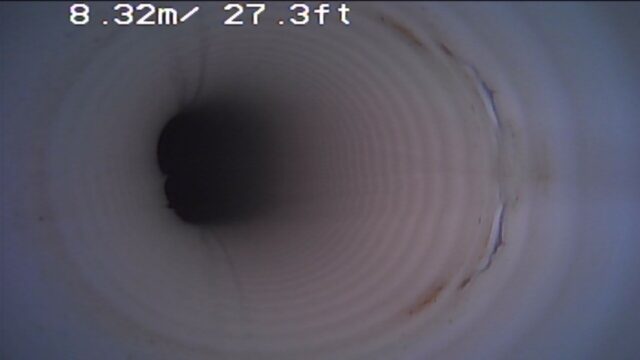
The process for using a pipe inspection camera is simple – feed the camera through the line to visually inspect the inside of the pipe. Typically, pipe inspection cameras will feature a small camera on the end of a flexible rod that can be pushed through the plumbing line. The camera will record a live visual of the inside of the pipe that can be viewed on a screen from the deck. Once a leak is identified, a transmitter on the camera head can be located from above ground with a locator to identify the precise location of the camera head and leak.

While feeding the camera through the pipe, watch for:

  • Cracks
  • Punctures
  • Blockages or crushed pipe
  • Air being pulled into the pipe while under suction
  • Movement of leak locating dye

Challenges:

It may not be possible to get the camera to the leak location.

Navigating the many 90-degree elbows and T-fittings in swimming pool plumbing poses a challenge. Fortunately, many of the new smaller inspection cameras can get past several 90-degree elbows with an aggressive push. This is especially the case with elbows close to the camera entry point, but the further down the plumbing line the camera gets, the less likely it is that the camera head will slide past an elbow. One way to help maneuver through bends is to tie a string to the end of the camera and gently tug on it to keep the camera head from getting stuck while pushing past elbows or T’s.

While camera designs and strings can help get a camera further down the line, there are still real limitations to getting a camera to certain points in pool plumbing. Long runs of plumbing, multiple jets on one line, and spa jets can prove difficult or impossible with the inspection camera method.

Swimming pool plumbing is hard on inspection cameras.

Pushing cameras through narrow pool plumbing can be hard on them, but durability has improved over the years and many cameras do a better job of taking the abuse of pool plumbing than they used to. It’s important to be mindful that the connection between the camera head and cable is especially vulnerable to damage when pulling the camera back through plumbing. Additionally, while getting a camera head stuck in the line isn’t common, it can happen.

The leak may not be visible even if the camera can reach it.

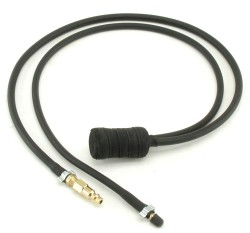
Pipe inspection cameras work best in large water loss situations where severed pipe or large cracks are clearly visible. However, sometimes smaller pipe leaks are impossible to see. For instance, a poorly glued fitting looks fine from the inside. Or, a crack on the inside of an elbow often isn’t visible due to the camera head position and angle. It is not uncommon to go right past the leak and not notice. In this case, administering leak locating dye in front of the camera near suspect areas in a option to test for or verify a leak location. This is done by attaching dye tester extension tubing to the camera head and feeding it into the pipe along with the camera. While this can help, it’s best to dye test within about 1/4″ of a suspected leak and dye often can’t be placed that precisely when it is injected this way.

The clearest visual you can get of a leak is when air bubbles get drawn into suction side plumbing through the leak when the pump is running. When this is the case, inspection cameras can be inserted through a skimmer or main drain to identify where the air is coming into the line.

Using pipe inspection cameras is time intensive.

While the pipe inspection camera method has some great benefits, time savings is not one of them. As with any method, you could get lucky and find the leak right away, but could also spend significant time watching the screen while wiggling the camera inch by inch through long plumbing runs. Plus, there are a surprising number of things in pool plumbing that look like leaks but may not actually be causing water loss. So even if you find what you think is a leak, you often have to use a secondary method to verify that it is indeed a source of water loss.

Key Equipment Features:

With many options on the market, there are a few characteristics to consider when purchasing a pipe inspection camera for swimming pools.

  • Clear and Well-lit Screen – Since most swimming pools are outside, a bright screen is important. Adjustable light settings on the camera head are also helpful.
  • Sonde Transmitter – Make sure the camera head is equipped with a transmitter than can be picked up with a locator.
  • Push Rod Length – Since most leaks are generally close to the pool or close to the equipment, you might be able to get by with a shorter camera rod length of 65′, but in order to inspect as much plumbing as possible, a 100′ length is desirable. You can enter from both ends of the pipe if needed.
  • Camera Head Size – Due to the prevalence of 1.5″ plumbing in swimming pools, you will want a smaller camera head that fits in that size pipe.
  • Push Rod Strength – The push rod should be more flexible for smaller piping (0.75 – 2″ piping) and stiffer for larger piping (2.5″ and up). Flexibility is often signified by cable diameter.
  • Durability and Reparability – Pool plumbing is hard on cameras – quality matters and so does the ability to repair the camera if you have issues.

Bottom Line:

While pipe inspection cameras are not needed to locate most underground pipe leaks, they can provide great value to the swimming pool leak detection process. The ability to locate the precise location of a leak through the use of a sonde and locator is unique, and providing pictures and videos of the leak can increase your professionalism. Plus, these images are great additions to a report. While inspection cameras may not be the go-to method in many situations, their inclusion in your toolbox is justified.


Open Inflatable Plugs: 550Q vs 550BP

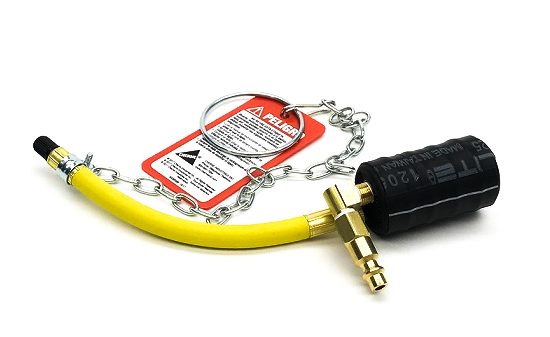
Trying to decide between the 550BP and 550Q open inflatable plugs? These plugs both provide a versatile solution for inducing pressure into 1-1/2″plumbing, but it can be hard to know which style is the right choice for your application.  Each plug includes a tire valve attachment for inflating the plug itself and a male quick connect attachment for inducing pressure into the plumbing with your pressure tester, but the way they’re structured is different. Read on to learn about the key differentiating features.

550Q (Q-Ball):

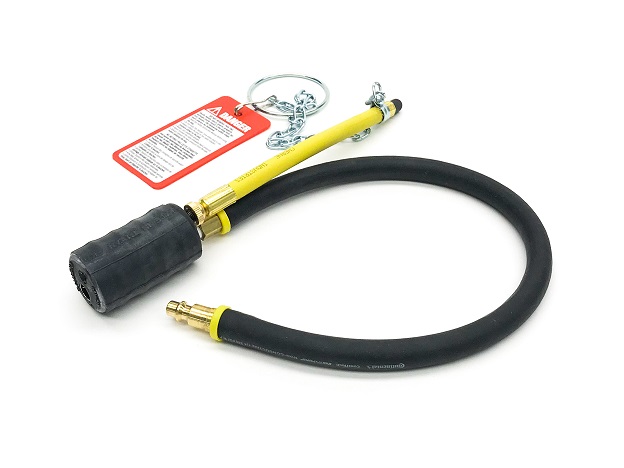
550Q Open Inflatable Plug

Benefits:
The most prominent feature of this plug is that the inflation and induction attachments are on the end of 2’ hoses, which allows the plug to be lodged farther into plumbing. It can be pushed past valves, through pumps, or past threads on return fittings. Also, the bypass tube that runs through the plug for inducing pressure is made of flexible rubber, so the plug can be bent in order to move around 90 degree elbows or other tight spaces.

Drawbacks:
The bypass tube on this plug is small, which means it takes a longer time to pressure up lines when using it. Since it’s also flexible it can be pinched when the plug is over-inflated and prevent air/water from flowing freely.


550BP:

550BP open inflatable plug

Benefits:
The biggest benefit of this plug is that the bypass tube is made of metal instead of rubber. This allows water or air to pass through the plug at a higher volume, which saves time and produces clearer pressure testing results. The induction attachment is an “L” shaped quick connect right off of the top of the plug, which works especially well in pump bowls and valves. Both the flexible inflation hose and quick connect are attached to threads on the top of the plug, so they can be replaced with longer air or inducer hoses for added versatility.

550BP open inflatable plug with CPH18
550BP-CPH plug with L-shaped quick connect replaced with an 18″ inducer hose.

Drawbacks:

The connections between the rubber and metal bypass tube on this plug are slightly weaker, so these plugs are more susceptible to wear and tear.

In general, inflatable plugs are more delicate than their mechanical, wing nut expanded counterparts. Their versatility and convenience make them an attractive option, but if you’re looking for a more durable, less-expensive solution, mechanical plugs are preferred. For 1-1/2” pipe the O45 Standard Open Plug or O45E Open Extender Plug can be used.


Understanding “No Water Loss” Leakalyzer Tests

While Leakalyzer tests that show water loss are extremely valuable for more efficiently locating leaks, using the Leakalyzer to identify when no water loss is happening is just as valuable.  One of the biggest wastes of time for a leak detector is trying to find a leak that doesn’t exist. But, leaks aren’t the only factors that cause a change in water level, and homeowners can be quick to call for help without considering the other factors that may be at play. In these situations the Leakalyzer can help confirm if in fact the pool is leaking before starting work. Or, once a leak has been found and repaired, a no water loss test can confirm that your repair is holding and that no other leaks are present.

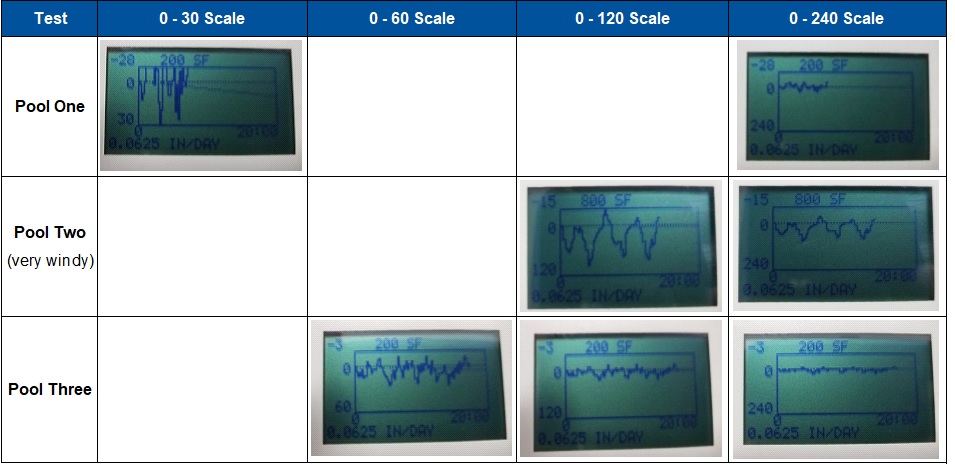
Even though it seems like reading these tests should be straight forward, the Leakalyzer is so sensitive that minuscule changes in water level that are smoothed out during a water loss test show up more significantly on a no water loss test, making the trend harder to identify. The spikes that show up on the graph in these situations don’t mean it’s a bad test, they just show that the Leakalyzer is being extremely accurate. Because of the movement in pools, the water level is constantly going up and down slightly. Remember, the Leakalyzer is able to measure water level changes down to the 10,000th of an inch (the size of a red blood cell!), so you’ll see these tiny changes on your graph.

When looking at the graph, the ability to identify trends is the key to effective use and interpretation. You’re trying to look past the up and down spikes to identify if as a whole they are trending flat or downward. For instance, if you are 10 or 15 minutes into the test and still consistently spiking on either side of zero or the evaporation mark it is most likely a no water loss situation. However, if the test is going up and down but both the highs and the lows are consistently getting lower there is most likely a leak.

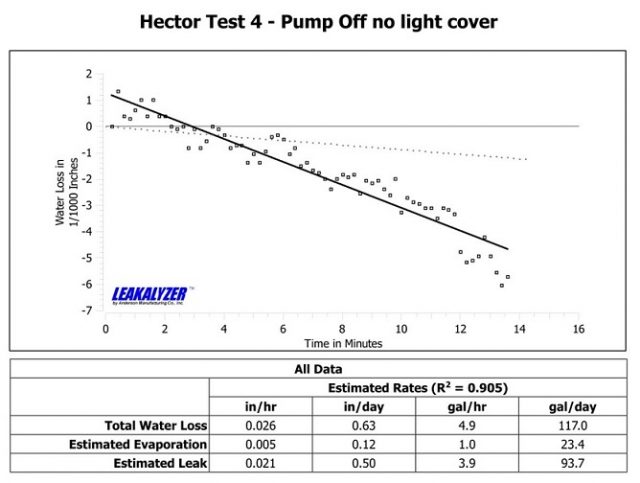
Another aspect to watch is the scale of the graph.  The scale automatically adjusts based on the measurements that the Leakalyzer is recording. Sometimes when the pool isn’t losing water, the ups and downs on the graph can look drastic, but the scale of the graph is still at 0 to 30. This makes for very dramatic spikes with very little actual change in the water level.  Zooming out to a 120 or 240 scale causes those spikes to look more realistic, and will help identify a flat line trend.  Remember, a measurement of 100 on the scale is only equal to the thickness of a sheet of paper! Take a look at the below graphs to understand how the scale affects no water loss tests.


Tip: Use Leakalyzer Tests to Check for Light Leaks

As a leak detector, you’re always looking for ways to creatively isolate and test different pool elements to make your jobs more efficient. So, if you’ve already got a pool light covered to run the LeakTrac, try this tip to determine if the light is leaking using the Leakalyzer.

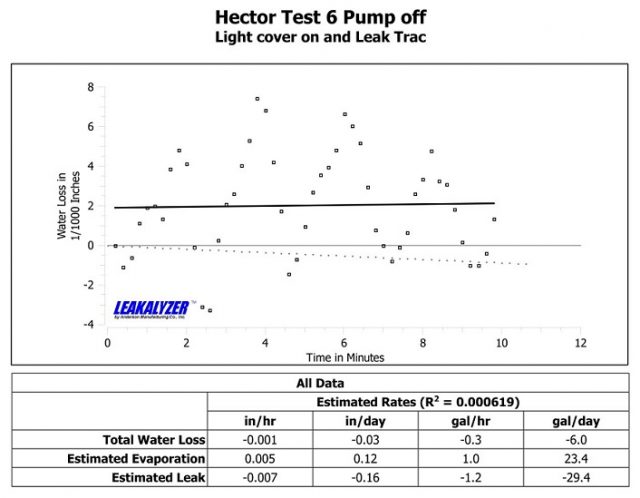
Once you arrive to the job and before setting up your LeakTrac, run a Leakalyzer test to establish what the baseline leak is. Then, once your LeakTrac is set up and the light cover is on, run a second test while you’re doing a scan with the LeakTrac. If the test shows less of a loss or no loss, you know to remove the light cover and investigate the light further.

Check out the below Leakalyzer reports to see how this technique worked on a recent job. Even if you don’t have a LeakTrac, the light cover can be purchased individually.


How Do Duck Plugs Compare to Competitor Blow-Out Plugs?

As the popularity of no-drain winterizing grows, it’s no surprise that there are new plugs to facilitate this process on the market. To help you understand how to evaluate these options, we set up a simulated pool plumbing system and tested the Duck Plug against our primary competitor’s blow-through plug. The tests were designed to imitate three key elements of the blow-out process and each test was performed using the Big Blue Blower. Check out our findings!

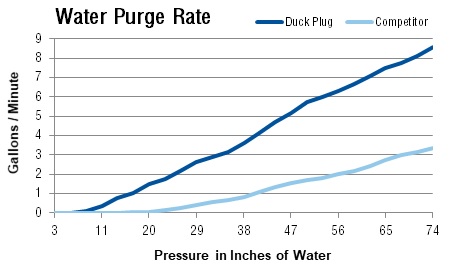
Water Purge Rate

At the initial stages of the line purging process 2-5 lbs of pressure is required to push water from the lines. During this phase Duck Plugs purge lines more than twice as fast as competitor’s plugs because the duck billed valve opens to a much larger unobstructed aperture. The competitor’s plug does not even open at lower pressures. This is especially a problem if using a lower performing blower and/or when some lines start blowing air and back pressure is reduced for the remaining filled lines.


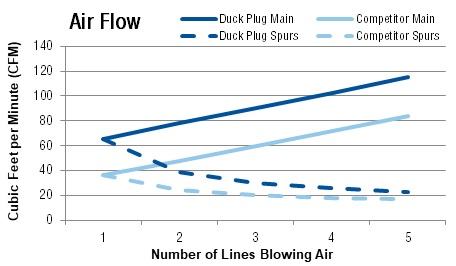
Air Flow

Because Duck Plugs open to a larger aperture, and do so at lower pressures, they also allow substantially more air flow as lines begin blowing air. Air flow is important to clear all water from lines even in low spots. As more lines begin blowing air, the flow rate increases at the main line (trunk) but decreases at each spur (branch). To increase flow at spur lines, Duck Plug valves can be easily blocked with simple paper clasps whereas competitor plugs have no way of being blocked.


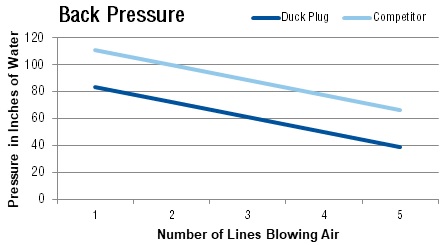
Back Pressure

The lower flow rate of the competitor’s plug creates a higher back pressure during the clearing stages of the process for a longer period of time. The blower therefore labors harder and longer to clear lines. This will cause the blower to heat up faster and wear out sooner.


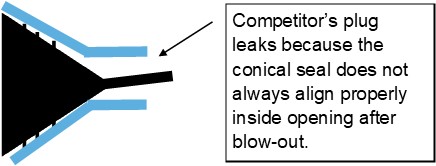
Seal

A final important difference was noted consistently during testing. The competitor’s plug slowly leaked water back into the purged line after the blower was turned off.  This resulted from the conical seal being pulled back into the funnel shaped opening at a slight angle. Duck Plugs, on the other hand, have been tested in thousands of pools over the toughest of winters without any known case of valve failure.


Want to see the Duck Plug in action? Check out this video to see for yourself how Duck Plugs and the Big Blue Blower work together to clear plumbing lines quickly and effectively.


Common Skimmer Repair Solutions

Skimmers are one of the more complex plumbing components in the pool and when they leak many contractors default to suggesting a full replacement. But if you have the right repair materials you can offer repair options that will save your customers this big expense and build their trust in you for future jobs. We’ve outlined repair solutions for some of the most common skimmer leaks below.

Mouth

On concrete pools, epoxy putty is a versatile option for repairing small cracks where the skimmer mouth meets the shell of the pool. Leakmaster Quick Set or Pool Repair putties are a cost-effective, convenient choice, while the color selection and workability of A+B Putty makes a good choice when aesthetics is especially important.  Putty is so inexpensive that many leak detectors include putty repair as part of the detection cost.  It is, however, a somewhat temporary repair and may have to be replaced seasonally.

A more permanent solution for skimmer mouth issues is to use a foam injection process to seal the cracks and fill voids around the skimmer body.  Closed cell urethane foam fills and stabilizes voids around the skimmer body to make sure that further damage doesn’t occur while also sealing leaks around the mouth. Our complete Crack Repair Starter Kit includes everything you need to to do a skimmer injection plus tools to expand into concrete crack injection, or our Skimmer Injection Kit provides the materials you need to inject 2-3 skimmers without an investment in the more expensive tools needed for crack injection.
Throat

For a cracked fitting or pipe within the first six inches from the bottom of the skimmer bowl, the Skimmer Saver is a unique and easy option. Part of the popular Fitting Saver line, this device allows water to bypass the cracked area of the plumbing while still maintaining regular circulatory function. It can be used as a permanent repair or as a temporary solution until another repair can be done.
Bowl/Body

Due to movement in the ground around the pool, skimmer bowls are especially susceptible to cracks that can be particularly challenging to repair. Leakmaster Pool Glue  provides a versatile solution. The two-part glue hardens like an epoxy putty but is much more adhesive, meaning it will be able to weather the movement of the pool without coming loose. While it’s able to seal smaller cracks on its own, it can also be used with fiberglass mesh strips for extra reinforcement on large cracks. Check out this video to see how the repair is done.

Leakalyzer Tip: How to Edit Data in the Reporter Program

Did you know that you can crop data in the Leakalyzer reporter program to make your reports clearer and more accurate? While seeing how the graph responds to a variety of environmental factors is helpful most of the time, there may be situations where an otherwise good test goes awry. Say a diver gets in the pool toward the end of a test and causes the water level to rise, but you still want to be able to include the test in a report for the homeowner. To avoid confusion you can remove the affected data from the .TXT file before it uploads into the reporter program. Here’s how it’s done.

Below is a good, clear test but it wasn’t stopped before a diver got in the water at the end of the test to make a repair. You can see the sharp rise and drop toward the end of the test – this is the portion we want to cut out.

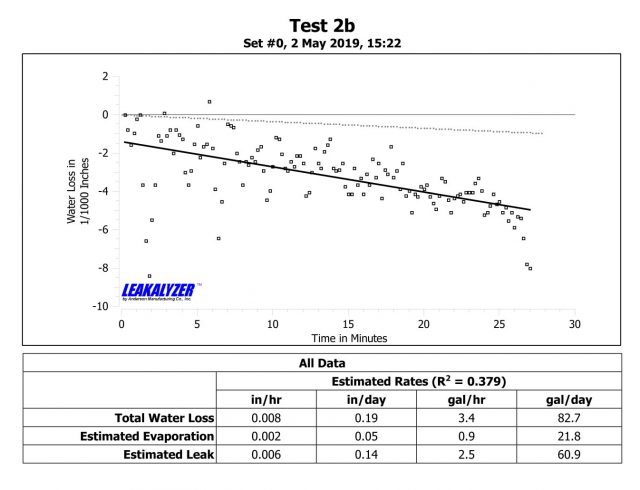
The same test in the Leakalyzer reporter program is below. Note that the detail information is inaccurate due to the surge when the diver was in the water.

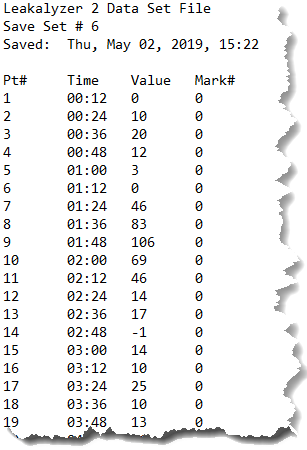
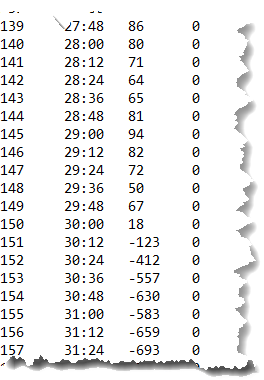
To create a reporter file without the misleading data at the end you can cut those data points out of the .TXT the Leakalyzer creates to upload the tests.  Open the .TXT file, which should look similar to below:

Find the points that correspond with the data you don’t want on the test and simply delete and re-save.  The portion below is what was deleted from the test:

An additional 30 lines of data were also removed

Save the new text file and import the updated version into the Leakalyzer Reporter Program. This will produce a much more accurate report of the water loss in the pool.  This is what the report looks like after the data was cleaned.

The estimates for inches per day and gallons per day are now more accurate and the graph is more indicative of what was actually happening to the water level of the pool.


Time Saving Products and Tips for Leak Jobs


Too many leaks and not enough time? Check out this list of time-saving products and tips to help you cruise though leak jobs as efficiently as possible.


1. Avoid callbacks by confirming all leaks have been found and fixed with the Leakalyzer.

Leaks can be deceiving, and even though you may think you’ve found the only leak in the pool there could be other smaller ones still hiding. Avoid having to return to a job site multiple times by running a Leakalyzer test before leaving to confirm the water level is no longer dropping. This ten minute step can save you hours of time!


2. Use Dye Testing Cones to quickly isolate problem plumbing areas.

Dye Testing Cones are a quick way to identify the flow of water in and out of pipes before starting a full pressure test. They can also be used with the Leaklyzer to isolate the shell of the pool or different lines while running tests. While they shouldn’t be a replacement for the definitive information pressure testing can provide, they can quickly help narrow your search area.


3. Spend less time inspecting vinyl liners by pinpointing leaks in minutes with the LeakTrac 2400.

There is no better way to find tiny punctures and tears in vinyl liners than with the LeakTrac 2400. Over the last 25 years, LeakTrac users have saved thousands of hours that they otherwise would have spent diving and dye testing.


Man uses LeakTrac 2400 near skimmer
4. Make sure to get complete and accurate information from customers before even arriving at the job site.

Asking the right questions of pool owners can save a lot of time during the information gathering step of a leak detection and lead you to to the leak faster. Check out our blog post for a guide to how to have a conversation that will make your actual time on the job more efficient.


5. Choose repair materials that are versatile, convenient, and work fast.

With a cure time of only 5 minutes,  Leakmaster Quick Set Putty is a great option for when you have limited time to make a repair, but still want something durable and long-lasting. Also, check out our pre-cut, clear Vinyl Paches that come in a variety of sizes and are the thickest on the market.


6. Avoid the extra step of purchasing and filling SCUBA tanks by using a Super Snorkel Tankless Dive Unit.

The Super Snorkel tankless dive unit makes diving a breeze and eliminates the need for extra stops to refill bulky air tanks. As much as many of us wish it wasn’t, diving is always going to be ultimately unavoidable in performing consistently successful leak detections, so it’s worth it to have a nimble, easy dive setup to make it as pain-free as possible.


7. Use Anderson Manufacturing to quickly guide you to the solutions and equipment you need.

Save time by calling us to help you determine what products will work best for your specific needs instead of spending time researching on your own. We’re driven by finding the best solution for you to be effective and profitable! We are also able to ship most orders on the same day they’re placed – so you can rely on us to fulfill orders fast.


How To: LeakTrac Tune Up

Use the following steps to tune up your LeakTrac for a busy season or to address performance issues.  If you’re stumped or would rather have us do a complete tune up you can send your unit into Anderson Manufacturing to be serviced. Just call and give us a heads up that it’s coming!

What You’ll Need

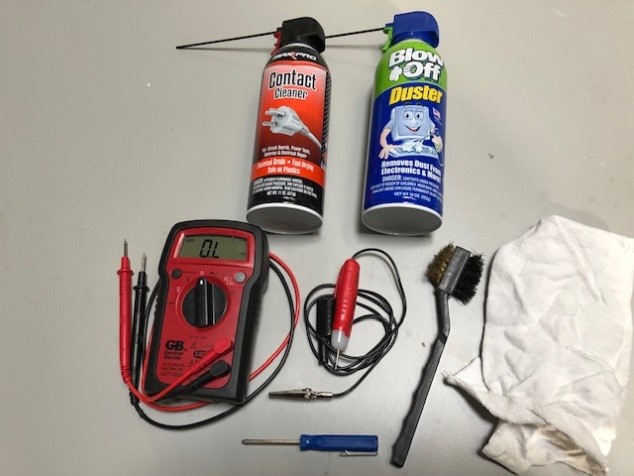
  • Electrical Contact Cleaner
  • Canned Air Duster
  • Volt Meter / Continuity Tester
  • Clean Cloth
  • Small Phillips Screw Driver
  • Small Brush
  • Steel Wool


Float and Ground Cables

The best place to start is a visual inspection of all cables for any nicks or breaks. The black float cable and the red ground wire are both single wire, so they are especially susceptible to damage. If there are any problems with these cables, replacements can be bought here.

The metal spring clips on the banana plugs at the end of the cables can get dirt under them after continued use and cause a poor connection. To clean, spray the banana plugs with contact cleaner, then squeeze the plug with a clean cloth and twist back and forth. Repeat this process a couple times then spray them off with the air duster.
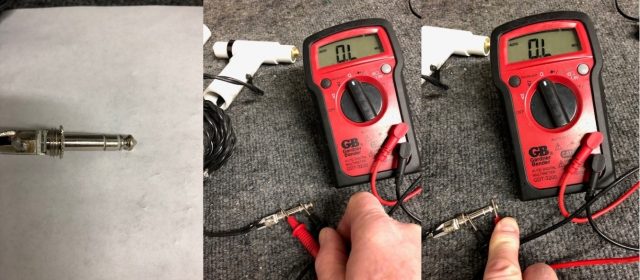
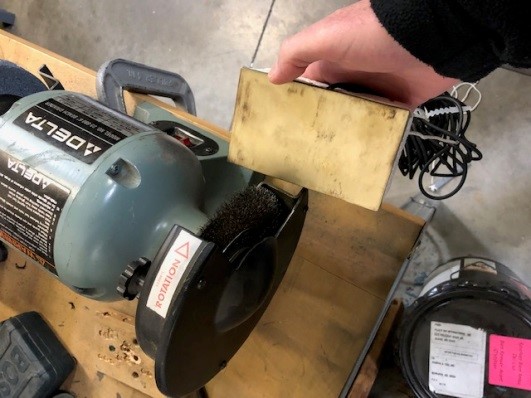
Next, using some steel wool or a wire grinding wheel, clean the brass plate and the red alligator clip. Both of these can get rust or corrosion on them and cleaning can improve the connection.
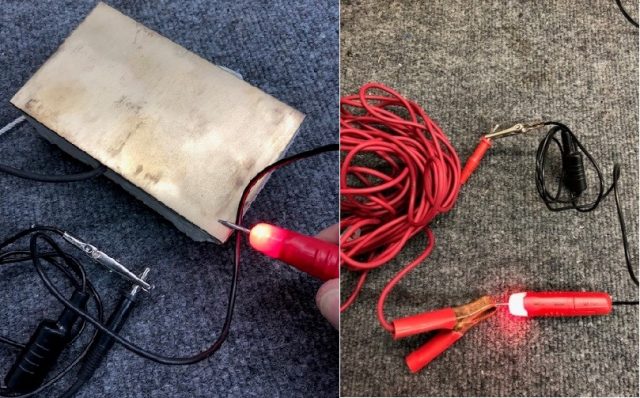
Finally, using the continuity tester check the cables by placing the tester leads on each end of the cables to make sure you have a good connection on each end.

Probe

Remove the PVC caps from each end of the probe. Using contact cleaner, spray the gold contacts and wipe off any dirt or corrosion with a clean cloth.

Next check the 1/4” plug and the cables. Using a volt meter on the Ohm’s setting, check the continuity between plug and the gold contacts. Place one of the meter leads on the tip of the plug and the other meter lead on the non-directional end of the probe (the end without the black band). If the wire and connections are good then the meter will give you a reading that there is resistance. If the meter indicates a zero reading then the probe has a broken wire or loose connection and the probe should be replaced.

Repeat the above process to test the other side of the probe. Place the meter lead on the second or middle contact on the plug and the other lead on the directional side of the probe (the one with the black band).

The last step is to check the ¼” plug for any shorts. Using the meter, place the leads on each of the three plug contacts in different combinations: i.e the tip and the middle, the tip and the base and the middle and the base. If you get any type of resistance reading for any of the combinations, you have a short in the plug and you need to replace the probe. There is a chance that the short is caused by moisture in the plug. You can try heating the plug with a hair dryer to dry out the moisture. If you get no resistance reading from the test after drying the plug then the probe is still functional.

Signal Processing Units

LT2100 and LT2200 Models

To check the unit, start by removing the screws and the top like you are changing the batteries. Remove the batteries and check the voltage using the volt meter. The batteries should read 9+ volts DC. If the batteries are lower replace them with new ones.

Next, check the battery holders for any corrosion. Clean the holders with contact cleaner if needed.

Using the contact cleaner, spray the main part of the rotary switch to clean any corrosion on the switch contacts.  Turn the switch back and forth 10 to 20 times. Blow off the switch with the canned air. Repeat the process one more time.

Check for other corrosion on the circuit board, especially on the ends of the wide ribbon cable that connects the main circuit board and the front panel. If there is any corrosion, spray with contact cleaner and clean with a brush or cloth.

Tighten any of the cable connectors on the back panel with a wrench.

Reinstall the batteries and the top of the box. Turn the power switch to low, medium and high. You should get a clicking sound an all three positions. If you do not, rotate the switch 10 to 20 times to see if that cleans off any corrosion and improves the clicking.

LT2400 Model

This model has digital circuitry and components and therefore doesn’t require as much maintenance.

Check the 2 AA batteries to make sure they are 1.5+ volts each. Also check the battery clips to make sure they are not rusted or corroded. Turn the unit on to make sure you can switch between all three positions.

Booster Box  

Remove the screws and the bottom panel.

Check the batteries, battery holders, and clips. The battery holders and clips should not have any rust or corrosion on the springs or contacts. If they do, you can try to clean the corrosion but it is best to replace the battery holders. These are standard 8 pack AA battery holders. If you cannot find them locally give us a call, we have them in-stock.

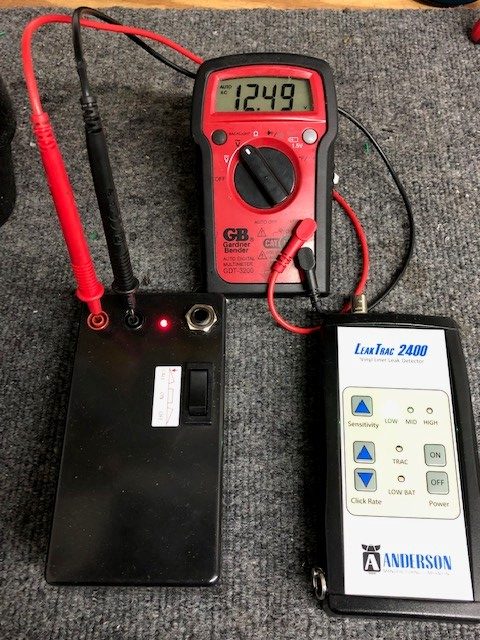
With the batteries reinstalled in the holders, use a volt meter to measure the voltage. Each battery pack should measure 12.5+ volts DC for each pack.

For the LT2100 and LT2200 models, remove the white plastic divider and examine the circuit board for any corrosion. Clean any corrosion with the contact cleaner and a brush or air duster.

Reconnect and replace the battery packs into the booster box.

Next we will check the output voltage of the booster. Turn on the SPU and the booster by using the stitch or button on the top of the booster.  (If you have a LT2100 model you will need to plug in the long booster cable before turning the unit on.) Using a volt meter set on AC current, place the meter leads in the two small plugs on the top of the booster. These are the red and black plugs where the float and ground wire connect. You should measure between 10 and 12 volts AC. If you do not get this voltage reading give us a call and our repair technician can help determine the problem.


A video explanation of this process is also available on YouTube. It features a LeakTrac 2100, but much of the process is still applicable for newer versions. Part One covers the Booster Box and SPU and Part Two covers all of the cables and the Probe.

If you run into any issues as you’re performing the tune up don’t hesitate to give us a call! We’re happy to trouble shoot with you over the phone.


Built to Last

We rarely toot our own horn, but sometimes we get feedback that’s too good to keep to ourselves. We recently got a LeakTrac 2100 back for service that had been used in the field for 20+ years! After a quick tune up we were able to get it ready to keep finding leaks.

LeakTrac2100 sent in for service, over 20 years old

This is actually a  common experience here at Anderson Manufacturing. We build our equipment to last, so you can depend on it for year after year. If something isn’t working quite right for you, send it in for service and we should be able to get it running like new in no time.

Investing in quality pays off!


Visa, Discover, MasterCard, American Express, & PayPal